Email is one of the most widely used forms of communication in today's digital world. As a developer, being able to send mails from your NodeJS application can come in handy in variety of situations. Thankfully, there is a great Open-Source module available for NodeJS called Nodemailer that makes it easy to send emails from your application.
Nodemailer is a module for Node.js applications to allow easy as cake email sending
Project Setup
We'll be using NextJS in this tutorial. First, we have to make a simple contact form to take inputs from the user.
Initialize a starting template for NextJS using the below command.
npx create-next-app@latest sending-mailsInstalling Nodemailer
npm install nodemailerContact form
Then after removing the starter code, create a simple form with the following fields - Email and Message.
import { useState } from "React";

export default function Contact() {
  const [userMail, setUserMail] = useState("");
  const [userMsg, setUserMsg] = useState("");

  return (
    <div>
      <h1>Contact form</h1>
      <form method="POST" action="/api/mailsend">
        <div>
          <label>Email</label>
          <input
            type="mail"
            value={userMail}
            onChange={(e) => setUserMail(e.target.value)}
          />
        </div>
        <div>
          <label>Message</label>
          <textarea
            value={userMsg}
            onChange={(e) => setUserMsg(e.target.value)}
          ></textarea>
        </div>
        <button type="submit">Send message</button>
      </form>
    </div>
  );
}
Styling the form
Applying minimal CSS to the form.
h1 {
  text-align: center;
}

form {
  width: 100%;
  display: flex;
  flex-direction: column;
  justify-content: center;
  align-items: center;
  gap: 10px;
}
Backend API
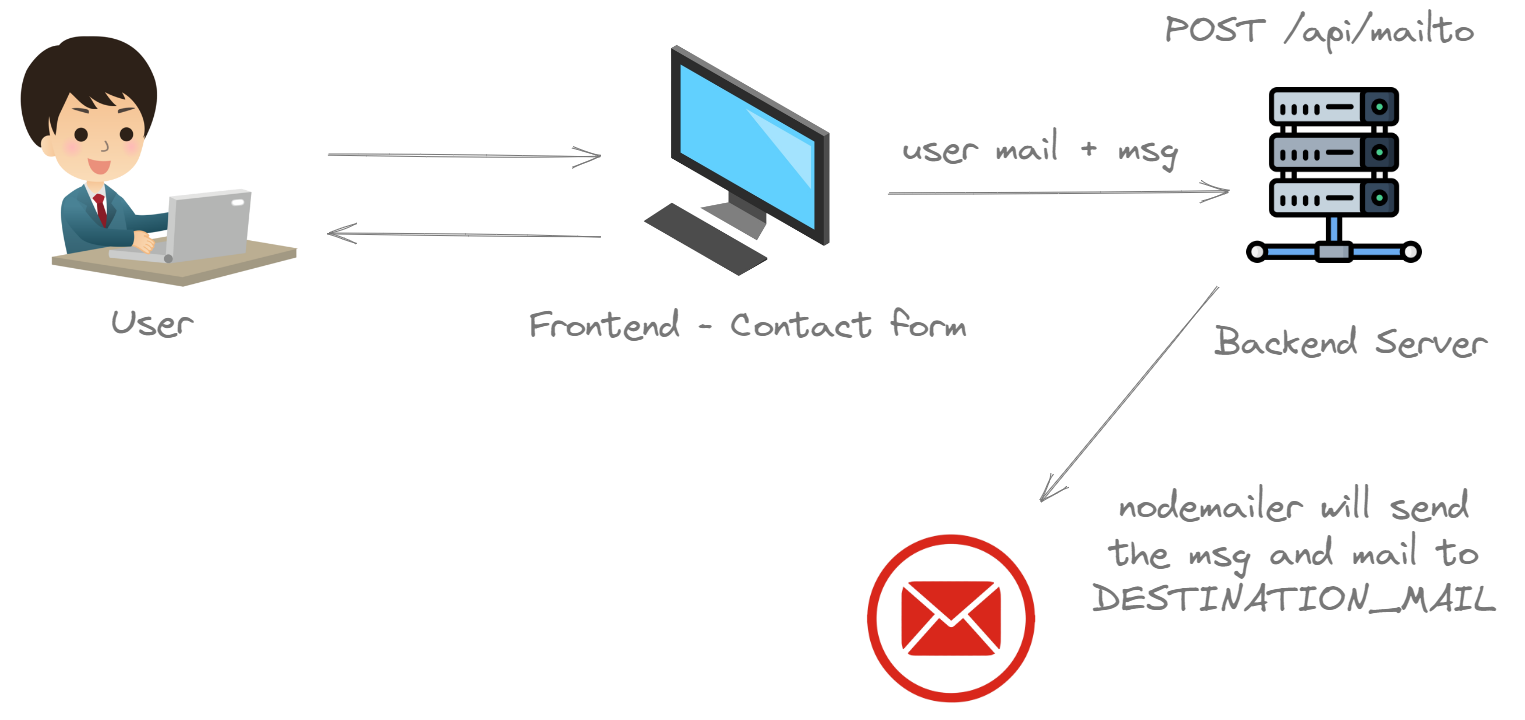
The contact form present in the frontend of the application will be sending the user's details to this API via a simple POST request.
import nodemailer from "nodemailer";

export default async function handler(req, res) {
  try {
    if (req.method === "POST") {
      const body = req.body;

      const {  userMail, userMsg } = body;

      // creating a transporter
      const transporter = nodemailer.createTransport({
        host: "smtp.gmail.com",
        port: 465,
        secure: true,
        auth: {
          user: process.env.USER_EMAIL,
          pass: process.env.USER_PASSWORD,
        },
      });

      const emailRes = await transporter.sendMail({
        from: userMail,
        to: DESTINATION_MAIL,
        subject: `New message from ${userMail}`,
        html: ${userMsg}
      ,
      });

      const info = await emailRes.messageId;
      console.log("Message ID - ", info);
      return res.status(200).json({ data: "Email sent successfully" });
    }

  } catch (error) {
    console.error(error);
    return res.status(500).json({ error: error.message });
  }
}
process.env.USER_EMAIL- Your email address from which you want to send emails.process.env.USER_PASSWORD- Password generated by your Google account for 3rd party applications.DESTINATION_MAIL- Email address where you want to receive mails.
Sending form data to API
After the user submits the form, we have to send the entered data to the backend
API /api/mailsend via POST request. Define a function onFormSubmit which will
be invoked when the form is submitted.
import { useState } from "React";

export default function Contact() {
+  const onFormSubmit = async (e) => {
+    e.preventDefault();
+
+    const response = await fetch("/api/mailsend", {
+      method: "POST",
+      headers: {
+        "Content-Type": "application/json",
+      },
+      body: JSON.stringify({ userMail, userMsg }),
+    });
+
+    const status = await response.status;
+    console.log(status); // 200 - success
+  };
  return (
    <div>
      <h1>Contact form</h1>
      ...
    </div>
  );
}
And that's pretty much it! You can also add error handling to this code. E.g, when the user submits any invalid email.
How does this work?
Closing Thoughts
Overall it's good compared to other paid services like EmailJS, SendGrid or SendInBlue which have limits on the number of emails per month.